Convert VMware virtual server to the physical PC
Posted on Jul 3, 2013 by  Vasily Bezruchkin

As I have written above, the whole process is going to be a long read. But at first let me share some background information why I decided to switch from VMware to a real server.
Background
Whether you are a single developer or a web development company you need a platform to develop your web based projects. The things are not that complicated when you are a single developer, as you can generally go with your own PC, no matter if it's Linux based (Ubuntu, Mint, Suse, etc.), Mac or Windows. There are several bundle tools for Windows that combine the specific software needed for the web server operation: Apache, PHP, MySQL in our case. They are: WAMP, XAMPP, OpenServer, etc. You only need some basic knowledge and few minutes to install them on PC and you can start developing PHP scripts immediately. Another way to get the web development environment ready is to use the virtual PC which gives you much more flexbility, though some extra pain also. There are several tools that allow to organize virtual machine on your PC. Historically we started to use VMware Workstation in 2005 and it was a great piece of software. We had a powerful PC at that moment and 2Gb RAM was quite enough for our local needs. Later we switched to VMware Server and in 2011 we finally switched to VMware Player that's free. There were no problems with the migrations as all three programs use the same files format. I used to give a chance to Oracle VirtualBox and I liked it much, though I actually had no reason to use it instead of VMware solutions. Anyway, I'd recommend that software if you have doubts what software to use for your virtual machine. You need to have a bit stronger knowledge background to organize a LAMP server from scratch, especially if you've never done this before. Anyhow, let's get back to the subject...
I was going to convert our virtual PC to a real physical one few months ago, but I could not find enough time to take care of this + our server did its work well. Few weeks ago we got a serious problem with the HDD crash on our server and host Windows OS didn't load. I made all the needed backups from another PC by connecting server HDD and made an OS recovery. It worked well, so I gave another chance to the same configuration. Last week we had another problem but that time the recovery didn't work so I took a decision to move the development from the guest virtual machine to the real physical PC. In this case we would have much more resources for the development server, though there are few contras as well. Backups were quite easier with the virtual machine way + we had IIS on the same server, that helped us to debug the software on IIS. I used the same server PC. I bought a new HDD for it and here comes the explanation what steps you might need to take in order to move your virtual VMware machine to a PC.
Conversion
I have a working PC with Ubuntu, so I installed VMware Player there and copied my server development virtual machine to Ubuntu's HDD. Brief steps:
- Run VMware Player
- Download CloneZilla - you need it to copy your data to physical PC
- In your VMware settings add another HDD - choose the destination HDD
- Set your VMware CD/DVD to run Clonezilla Live CD iso file
- Make your CD device bootable by default in your guest VMware machine
Once you power on your VMware virtual machie you will find yourself in the clonezilla software. Here is the article that helped me to do everything correctly. Please follow the instructions step by step and I'm sure you won't face any problems. Please note that CloneZilla gives you the choice to use ATA or SCSI device - go with SCSI. My personal experiece says it only takes 2 hours to migrate 100Gb virtual machine HDD in comparison to 18 hours of ATA way migration.
So now you can install your HDD on your server and boot from that device. Everything should work fine, or at least it worked fine for my CentOS 6.4 guest OS. But I got one more challenge this time. My virtual machine HDD was 100Gb and the new one is 320. 220Gb more, but the operating system does not see that significant space increase. We need to give the instructions how to identify the new unpartitioned space...
Convert unpartitioned HDD space to a LVM logical volume
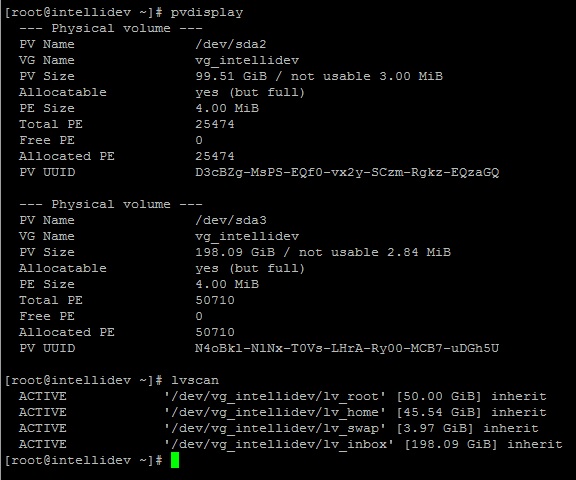
One of the great things about enterprise Linux distro installations, such as RedHat, SLES, etc is that most of them are defaulting to a LVM (Logical Volume Manager) filesystem which is a natural fit for Linux virtualized systems. My guest CentOS 6.4 used the same default LVM scheme:
sda -> vg_intellidev -> lv_root / lv_home / lv_swap
pvscan or pvdisplay commands can show you the structure of your physical volumes. So you can check your current structure.
So how we convert the unpartitioned space into usable filesystem so it can be included within the LVM filesystem. Boot into the VM, su to the superuser account (typically it's root) and find the device where the unpartitioned space is:
fdisk -l
Since we converted from a virtual machine that only had one HDD, this is going to be the first disk expansion it should be /dev/sda device. You will see the total size of your new HDD, 320Gb in our case.
So now we need to create a new partition that takes up the remaining space and uses LVM filesystem type that's equivalent to 8e.
fdisk /dev/sda
now use the following commands inside fdisk utility:
- n - create new partition
- p - make primary partition
- 3 - partition number, since 1st and 2nd partition already exists
- select default first available cylinder to the default last cylinder
- t - type
- 3 - partition number
- 8e - set type to LVM
- p - view the new partitions layout
- w - write out the new partitions layout to disk
- q - quit fdisk
Now we need to reboot the system so the new partition is recognized by the system.
reboot
Our next step is to use LVM to take the newly formed partition and turn it into a new Physical Volume, add it to a Volume Group, and finally assimilate its free space into a Logical Volume.
Convert /dev/sda3 partition into a Physical Volume so LVM can make use of it:
pvcreate /dev/sda3
Now we need to add this created device to our virtual group:
vgextend vg_intellidev /dev/sda3
Creating a new volume on an existing LVM group is easy. Let's create a new logical volume lv_inbox in a virtual group vg_intellidev using all free space of our virtual group:
lvcreate -l 100%FREE -n lv_inbox vg_intellidev
Create a ext4 filesystem on the logical lv_inbox volume so we could use it:
mkfs.ext4 /dev/vg_intellidev/lv_inbox
So your logical volume is ready now. You can try to mount it and check if it's usable, here comes mount command to help us:
mount /dev/sda3 /mnt
And the final step is to mount newly created logical volume automatically on each boot. There are several ways to do that. Here is the most simple one for me that worked as expected. You need to edit /etc/fstab file and add the following line to the file:
/dev/mapper/vg_intellidev-lv_inbox /mnt/inbox ext4 defaults 1 3
Now reboot your server. Voila! Now you can use the new space added on your HDD increase after V-P migration. Hope this article can help to anyone who has the same challenge!